-
Notifications
You must be signed in to change notification settings - Fork 6
Deployment (for dummy)
This is step-by-step instruction on how to install Fabric Lab Scheduler website. This page is intended for people with little or no background knowledge on installing a website. For compacted version, please refer to this page.
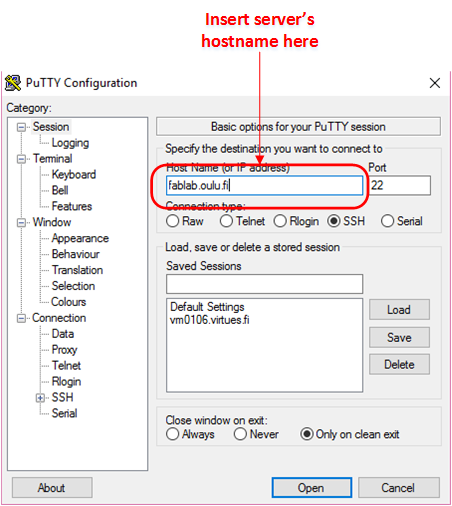
To run commands on remote Linux server, we use a program called Putty, which can be downloaded here
For convenience reason, assume that our server's hostname is fablab.oulu.fi
- PHP 5.4+
- MySQL 5.0+
There are several choices to install PHP and MySQL in software packages such as Xampp, WampServer, EasyPHP... In this example, we use Xampp on CentOS. Instruction on how to install Xampp on different OSes can be found here.
-
Step 1: go to https://www.apachefriends.org/download.html and download the lastest Xampp version. The downloaded file should have name like this: xampp-linux-*-installer.run
-
Step 2: upload the file to your server
-
Step 3: use Putty to login to server

-
Step 4: run the following commands (replace * to fit your downloaded file)
chmod 755 xampp-linux-*-installer.run
sudo ./xampp-linux-*-installer.run
- Step 5: to start xampp, run
sudo /opt/lampp/lampp start
- Step 1: download the website from repository as zip and unzip it
- Step 2: upload the content of the zip file to /opt/lampp/htdocs/fablab
- Step 3: run your local web browser and go to http://fablab.oulu.fi/phpmyadmin/, login with account "root", password blank
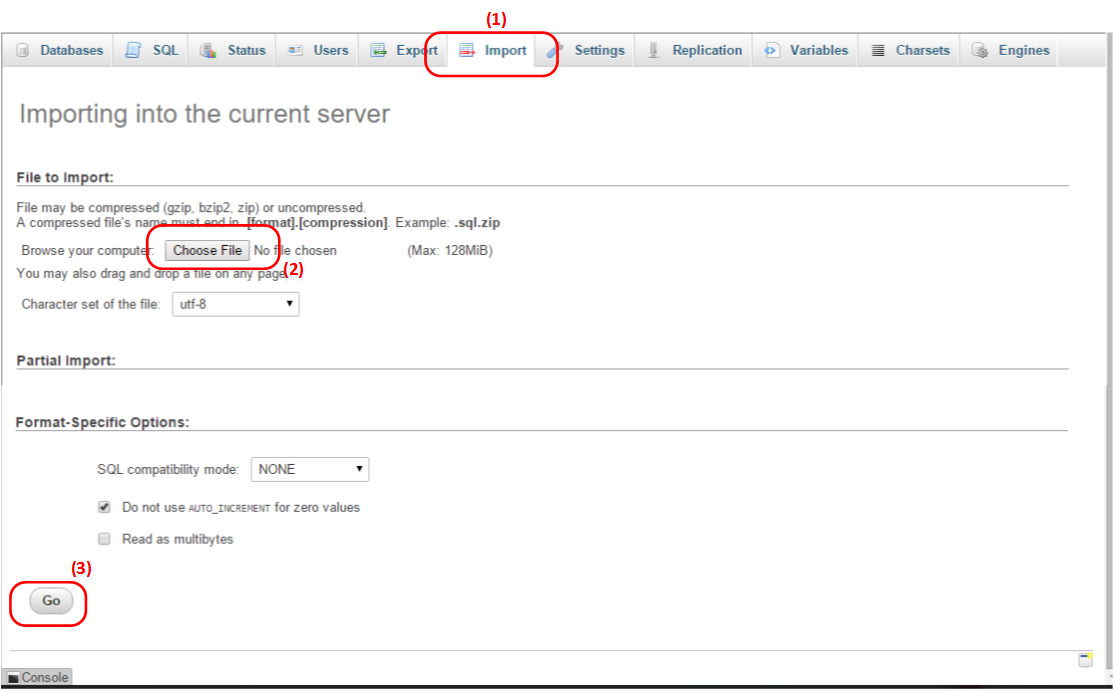
- Step 4: Click "Import" button at the top menu (1), click file button (2), choose Fab-Lab-Scheduler/sql schema/dump.sql (with Fab-Lab-Scheduler is the content of the zip file), go to the bottom of the page and click "Go" (3)

- Fab-Lab-Scheduler/application/config/config.php. You should set at least your base url. To enable secure communication, don't forget to use HTTPS base url (e.g. https://example.com).
- Fab-Lab-Scheduler/application/config/databese.php. Set up your database credentials/settings.
- Fab-Lab-Scheduler/application/config/email.php. Set up your email credentials/settings.
- Fab-Lab-Scheduler/index.php. You might want to change to production environment.
- Fab-Lab-Scheduler/assets/images/jt_full_home.png. Background image of the homepage
- Fab-Lab-Scheduler/assets/images/jt_info.png. Background image of content page
- Fab-Lab-Scheduler/application/language/english/aauth_lang.php. Title and content of pages in the website
If everything goes fine, you should be able to login with default admin (email: admin@example.com, pass: admin). You should remove the default account once you have setup your own.
There are many ways to edit content of a file after uploaded to server. One way is to download the file, make the change, and then upload it again. In this instruction, we introduce a service that allow edit files on-the-fly after uploaded to server. The service is https://codeanywhere.com. Note: the service will remember the server and login credential information, use it at your own risk.
- Step 1: Create a free account from https://codeanywhere.com
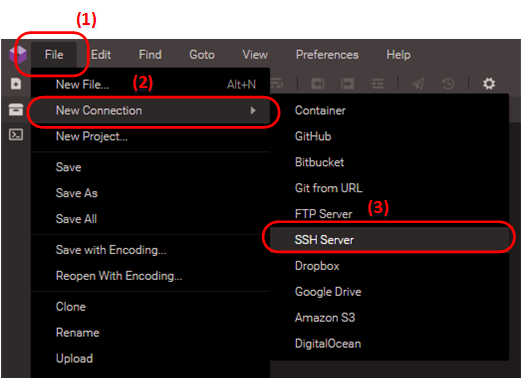
- Step 2: In upper menu, click "File" (1), hover your mouse at "New Connection" (2) then click "SSH Server" (3)

- Step 3: A new window appear, input the server's credential information. Insert the server's information here. Note: insert "/opt/lampp/htdocs/fablab" at "Initial Dir" textbox.
- Step 4: the server name should appear at the left menu of the website. Now you can make the changes to files just like a local text editor.
Go to http://fablab.oulu.fi/fablab to run the website